Tutorial: Build a protected workflow for your project
DETAILS: Tier: Free, Premium, Ultimate Offering: GitLab.com, Self-managed, GitLab Dedicated
When your team starts a new project, they need a workflow that balances efficiency with appropriate reviews. In GitLab, you can create user groups, combine those groups with branch protections, and then enforce those protections with approval rules.
This tutorial sets up protections for the 1.x and 1.x.x release branches of an
example project named "Excelsior", and creates a minimal approval workflow for the project:
- Create the
engineeringgroup - Create subgroups in
engineering - Add users to the subgroups
- Create the Excelsior project
- Add a basic CODEOWNERS file
- Configure approval rules
- Enforce CODEOWNER approval on branches
- Create the release branches
Before you begin
- You must have the Maintainer or Owner role.
- You need a list of managers and their email addresses.
- You need a list of your backend and frontend engineers, and their email addresses.
- You understand semantic versioning for branch names.
Create the engineering group
Before setting up Excelsior Project, you should create a group to own the project. Here, you'll set up the Engineering group:
- On the left sidebar, at the top, select Create new ({plus}) and New group.
- Select Create group.
- For Group name, enter
Engineering. - For the Group URL, enter
engineering. - Set the Visibility level to Private.
- Personalize your experience so GitLab shows the most helpful information to you:
- For Role, select System administrator.
- For Who will be using this group? select My company or team.
- For What will you use this group for? select I want to store my code.
- Skip inviting members to the group. You'll add users in a later section of this tutorial.
- Select Create group.
Next, you'll add subgroups to this engineering group for more granular control.
Create subgroups in engineering
The engineering group is a good start, but Excelsior Project's
backend engineers, frontend engineers, and managers
have different tasks, and different areas of specialty.
Here, you'll create three more granular subgroups in the Engineering group to
segment users by the type of work they do: managers, frontend, and backend.
Then you'll add these new groups as members of the engineering group.
First, create the new subgroup:
-
On the left sidebar, select Search or go to and search for
engineering. Select the group namedEngineering: -
On the overview page for the
engineeringgroup, in the upper-right corner, select New subgroup. -
For the Subgroup name, enter
Managers. -
Set the Visibility level to Private.
-
Select Create subgroup.
Next, add the subgroup as a member of the engineering group:
- On the left sidebar, select Search or go to
and search for
engineering. Select the group namedEngineering. - Select Manage > Members.
- In the upper right, select Invite a group.
- For Select a group to invite, select
Engineering / Managers. - When adding the subgroups select the role Maintainer.
This configures the highest role a member of the subgroup can inherit when accessing the
engineeringgroup and its projects. - Optional. Select an expiration date.
- Select Invite.
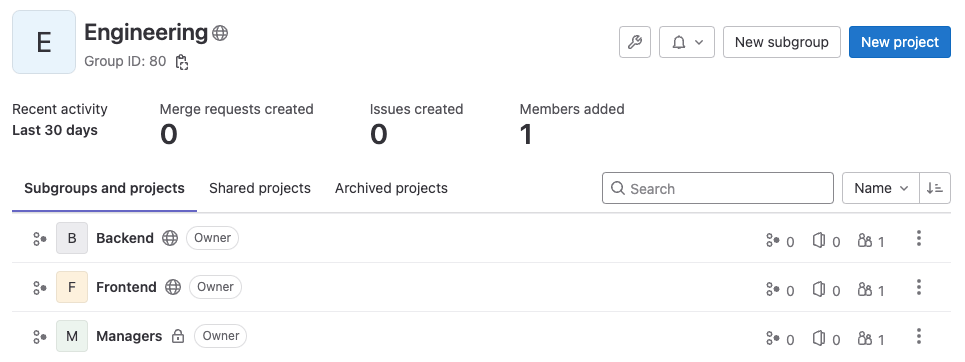
Repeat this process to create subgroups for backend and frontend. When you're done,
search for the engineering group one more time. Its overview page should show
three subgroups, like this:
Add users to the subgroups
In the previous step, when you added your subgroups to the parent group (engineering), you limited
members of the subgroups to the Maintainer role. This is the highest role they can inherit
for projects owned by engineering. As a result:
- User 1 is added to the
managersubgroup with the Guest role, and receives the Guest role onengineeringprojects. - User 2 is added to the
managergroup with the Owner role. This role is higher than the maximum role (Maintainer) you set, so User 2 receives the Maintainer role instead of Owner.
To add a user to the frontend subgroup:
- On the left sidebar, select Search or go to
and search for
frontend. Select theFrontendgroup. - Select Manage > Members.
- Select Invite members.
- Fill in the fields. Select the Developer role by default, increasing it to Maintainer if this user reviews the work of others.
- Select Invite.
- Repeat these steps until you've added all of the frontend engineers into the
frontendsubgroup.
Now do the same with the backend and managers groups. The same user can be a
member of multiple subgroups.
Create the Excelsior project
Now that your group structure is in place, create the excelsior project
for the teams to work in. Because both frontend and backend engineers
are involved, excelsior should belong to engineering instead of any of the
smaller subgroups you just created.
To create the new excelsior project:
- On the left sidebar, select Search or go to and
search for
engineering. Select the group namedEngineering. - On the overview page for the
engineeringgroup, on the left sidebar, at the top, select Create new ({plus}) and In this group > New project/repository. - Select Create blank project.
- Enter the project details:
- In the Project name field, enter
Excelsior. The Project slug should auto-populate withexcelsior. - For Visibility Level, select Public.
- Select Initialize repository with a README to add an initial file to the repository.
- In the Project name field, enter
- Select Create project.
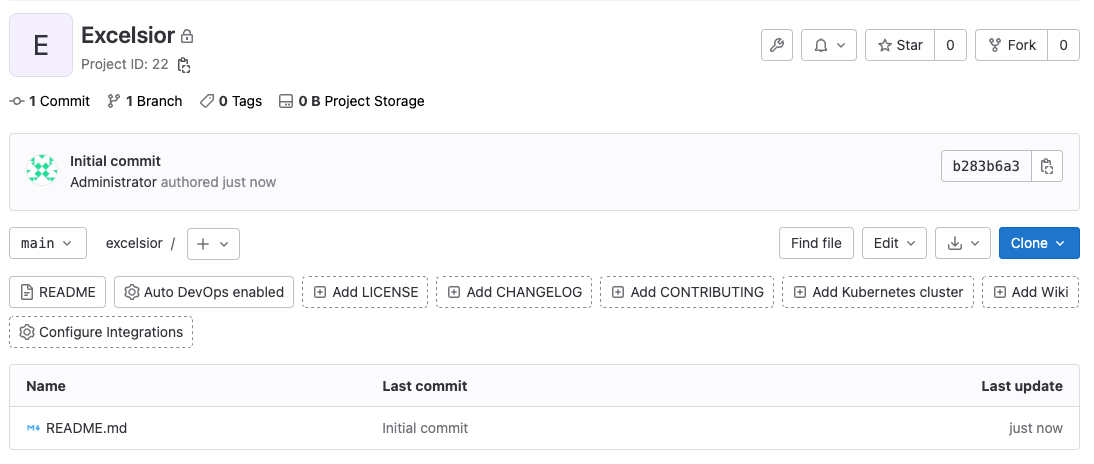
GitLab creates the excelsior project for you, and redirects you to its homepage.
It should look like this:
You'll use a feature on this page in the next step.
Add a basic CODEOWNERS file
Add a CODEOWNERS file to the root directory of your project to route reviews to the right subgroup. This example sets up four rules:
- All changes should be reviewed by someone in the
engineeringgroup. - A manager should review any change to the CODEOWNERS file itself.
- Frontend engineers should review changes to frontend files.
- Backend engineers should review changes to backend files.
NOTE: GitLab Free supports only optional reviews. To make reviews required, you need GitLab Premium or Ultimate.
To add a CODEOWNERS file to your excelsior project:
-
On the left sidebar, select Search or go to and search for
Excelsior. Select the project namedExcelsior. -
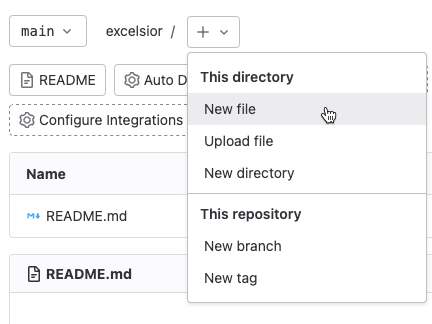
Next to the branch name, select the plus icon ({plus}), then New file:

-
For Filename, enter
CODEOWNERS. This will create a file namedCODEOWNERSin the root directory of your project. -
Paste this example into the editing area, changing
@engineering/if it does not match your group structure:# All changes should be reviewed by someone in the engineering group * @engineering # A manager should review any changes to this file CODEOWNERS @engineering/managers # Frontend files should be reviewed by FE engineers [Frontend] @engineering/frontend *.scss *.js # Backend files should be reviewed by BE engineers [Backend] @engineering/backend *.rb -
For a Commit message, paste in:
Adds a new CODEOWNERS file Creates a small CODEOWNERS file to: - Route backend and frontend changes to the right teams - Route CODEOWNERS file changes to managers - Request all changes be reviewed -
Select Commit changes.
The CODEOWNERS file is now in place in the main branch of your project, and
available for all future branches created in this project.
Configure approval rules
The CODEOWNERS file describes the appropriate reviewers for directories and file types. Approval rules direct merge requests to those reviewers. Here, you will set up an approval rule that uses the information in your new CODEOWNERS file and adds protection for release branches:
- On the left sidebar, select Search or go to and
search for
Excelsior. Select the project namedExcelsior. - Select Settings > Merge requests.
- In the Merge request approvals section, scroll to Approval rules.
- Select Add approval rule.
- Create a rule named
Enforce CODEOWNERS. - Select All protected branches.
- To make the rule required in GitLab Premium and GitLab Ultimate,
set the Approvals required to
1. - Add the
managersgroup as approvers. - Select Add approval rule.
- Scroll to Approval settings and make sure Prevent editing approval rules in merge requests is selected.
- Select Save changes.
When added, the Enforce CODEOWNERS rule looks like this:
Enforce CODEOWNER approval on branches
You've configured several protections for your project, and you're now ready to combine those protections together to safeguard your project's important branches:
- Your users are sorted into logical groups and subgroups.
- Your CODEOWNERS file describes the subject matter experts for file types and directories.
- Your approval rule encourages (in GitLab Free) or requires (in GitLab Premium and GitLab Ultimate) the subject matter experts to review changes.
Your excelsior project uses semantic versioning for
release branch names, so you know the release branches follow the pattern 1.x
and 1.x.x. You want all code added to these branches to be reviewed by subject
matter experts, and for managers to make the final decision on what work is merged
into the release branch.
Rather than create protections for a branch at a time, configure wildcard branch rules to protect multiple branches:
- On the left sidebar, select Search or go to and
search for
Excelsior. Select the project namedExcelsior. - Select Settings > Repository.
- Expand Protected branches.
- From the Branch dropdown list, type
1.*, and then select Create wildcard1.*. - To require everyone to submit merge requests, rather than pushing commits directly:
- Set Allowed to merge to Maintainers.
- Set Allowed to push and merge to No one.
- Leave Allowed to force push disabled.
- In GitLab Premium and GitLab Ultimate, to require Code Owners to review changes to files they work on, toggle Require approval from code owners.
- Select Protect.
- In the table of branches, find the rule marked as
Default. (Depending on your version of GitLab, this branch might be namedmainormaster.) Set the values for this branch to match the settings you used for the1.*rule.
Your rules are now in place, even though no 1.* branches exist yet:
Create the release branches
Now that all branch protections in place, you're ready to create your 1.0.0 release branch:
- On the left sidebar, select Search or go to and
search for
Excelsior. Select the project namedExcelsior. - Select Code > Branches.
- In the upper-right corner, select New branch. Name it
1.0.0. - Select Create branch.
The branch protections are now visible in the UI:
-
On the left sidebar, select Code > Branches. In the list of branches, branch
1.0.0should be show that it is protected: -
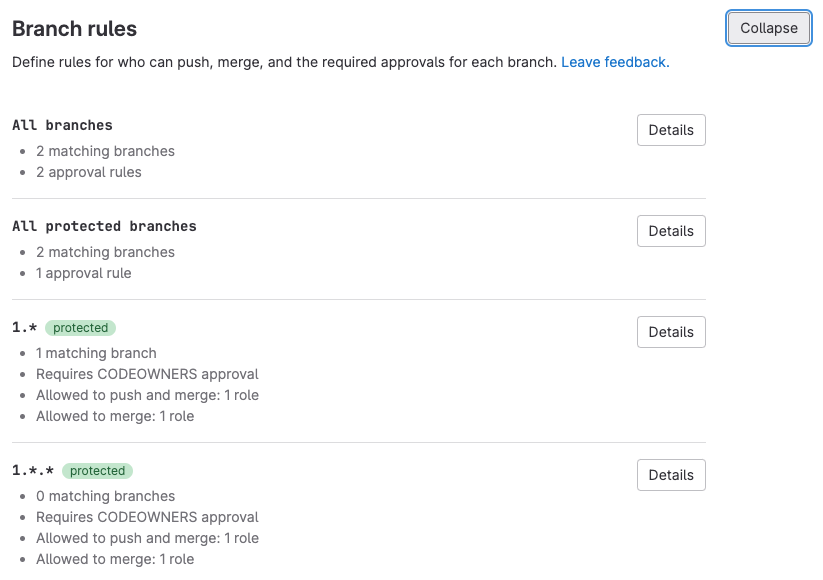
On the left sidebar, select Settings > Repository, then expand Branch rules to see details about all protected branches:
Congratulations! Your engineers can work independently in their branches, and all code submitted for consideration for the 1.0.0 release branch will be reviewed by subject matter experts.


